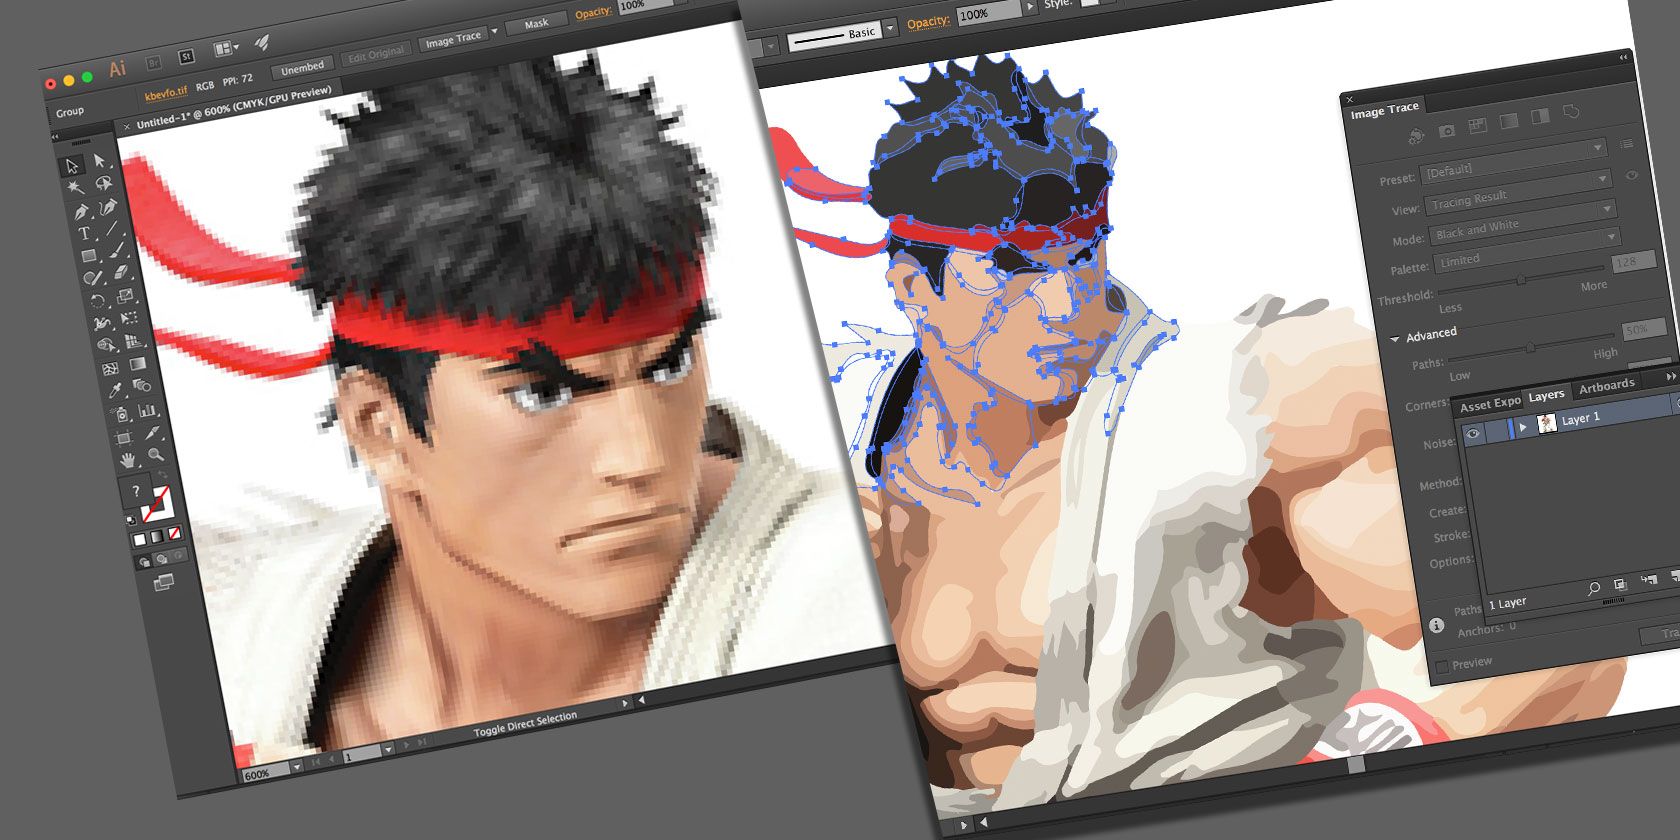
To change raster to vector in illustrator, follow these steps: open illustrator, import the raster image, select the image, and use the “image trace” function to convert it to a vector format. This process allows you to transform a pixel-based image into a scalable vector graphic that can be resized without losing quality or sharpness.
By using the image trace feature in illustrator, you will have greater flexibility and versatility in editing and manipulating your design. Whether you are working on a logo, illustration, or any other graphic element, converting raster images to vector format in illustrator ensures smooth lines, clean shapes, and easy customization.
Credit: www.makeuseof.com
Importing Raster Image Into Illustrator
Import raster images into illustrator to effortlessly convert them to vector format. Learn how to transform your designs using illustrator’s powerful tools.
Explaining The Import Process:
Importing raster images into adobe illustrator is a fundamental step in converting them to vector format. This article will guide you through the import process, covering file format considerations, as well as checking image resolution and quality. Let’s get started!
File Format Considerations:
When importing a raster image into illustrator, it’s essential to choose the right file format that suits your needs. Here are the common file formats you can use:
- Jpeg: Ideal for photographs and images with continuous colors. However, it may result in lossy compression and reduced quality.
- Png: Great for graphics with transparent backgrounds. Png files support lossless compression, preserving image quality.
- Tiff: Provides high-quality images and is compatible with both raster and vector formats. However, tiff files can be larger in size.
- Psd: Photoshop files can be imported directly into illustrator, allowing you to retain layers and edit them individually.
Keep in mind that choosing the appropriate file format depends on the type of image, its purpose, and the desired outcome.
Checking Image Resolution And Quality:
Before importing a raster image into illustrator, it’s important to assess its resolution and quality. Follow these steps to ensure a smooth import process:
- Open the image in a photo editing software like adobe photoshop or any other quality image editing tool.
- Check the resolution of the image in dots per inch (dpi) or pixels per inch (ppi). Higher resolutions provide better detail and print quality.
- Verify that the image’s resolution is suitable for your intended use. For web graphics, a resolution of 72 dpi is usually sufficient, while print graphics require higher resolutions depending on the output size.
- Evaluate the image’s overall quality and ensure there are no visible distortions, blurriness, or artifacts. If there are any issues, consider using photo editing tools to enhance the image before importing it into illustrator.
By verifying the resolution and quality of your raster image, you can ensure a smooth import process and maintain the desired level of detail and clarity in your vector artwork.
Now that we’ve explained the import process, file format considerations, and checked image resolution and quality, you’re ready to proceed with converting your raster images into vector format using adobe illustrator. Happy designing!
Tracing Raster Image
Learn how to convert raster images to vector format in adobe illustrator with ease. This tutorial provides step-by-step instructions for this transformation process that will help you achieve professional and high-quality results.
Raster images are made up of pixels, which can cause limitations when it comes to scaling and editing. However, by using illustrator’s powerful image trace feature, you can easily convert raster images into vector graphics. In this section, we will walk you through the process of tracing a raster image in illustrator using the image trace tool.
Overview Of The Image Trace Tool
The image trace tool in illustrator allows you to automatically trace and convert a raster image to a vector graphic. It’s a powerful tool that analyzes the colors and shapes in an image to create a vector representation. Here is an overview of how the image trace tool works:
- When you select an image and apply the image trace tool, illustrator scans the image and identifies the colors and shapes.
- The tool then creates paths and fills based on the detected colors and shapes, resulting in a vector image.
- The vector image can be scaled up or down without losing quality, making it ideal for various design projects.
Choosing The Appropriate Trace Preset
To achieve the best results when tracing a raster image, it’s crucial to choose the appropriate trace preset. Illustrator offers a range of preset options that allow you to control the level of detail and accuracy of the vector conversion.
Consider the following when selecting a trace preset:
- Default tracing: This preset is a good starting point for most images, providing a balance between detail and simplicity.
- High fidelity photo: Use this preset for photographs or complex images where preserving the finest details is crucial.
- Black and white logo: This preset is suitable for converting black and white logos or line art into vector format.
- Low fidelity photo: If you want a simpler representation of your image, this preset reduces detail and complexity.
- Custom trace settings: For advanced users, you can customize the trace settings based on your specific requirements.
Adjusting Trace Settings For Optimal Results
While the preset options are convenient, you can fine-tune the trace settings to achieve optimal results for your raster image. Here are some settings you can adjust:
- Threshold: Adjusting the threshold value affects the number of colors detected in the image. Higher values result in fewer colors, while lower values capture more colors.
- Paths vs. Outlines: By default, illustrator creates paths and fills for traced images. However, you can choose to create outlines only if you prefer a simpler representation.
- Mode: The mode option allows you to define how colors are treated in the traced image. You can choose between color, grayscale, or black and white.
- Noise: Reduce noise in the image by adjusting the noise value. Higher values remove more small details, while lower values retain more of the original image.
By adjusting these trace settings, you have greater control over the final appearance of your vector image, ensuring it meets your specific needs.
Remember, the image trace tool in illustrator provides a convenient way to convert raster images to vector graphics. Choose the appropriate trace preset, adjust the trace settings, and watch as your raster image transforms into a scalable vector graphic, ready for use in your design projects.
Refining And Editing The Vector Image
Refine and edit your vector image easily with illustrator. Learn how to convert raster to vector efficiently in just a few steps. Get professional-looking results with our helpful guide.
Once you have successfully converted your raster image to a vector in illustrator, you may need to refine and edit the vector image further to achieve the desired results. This process involves using various tools and techniques to enhance and optimize the vector image.
Exploring The Live Paint Bucket Tool:
The live paint bucket tool in illustrator allows you to quickly apply color to enclosed areas in your vector image. Here’s how you can make the most of this tool:
- Select the live paint bucket tool from the tools panel.
- Choose a fill color from the swatches panel or create a custom color using the color panel.
- Click on the enclosed area you want to colorize. The live paint bucket tool will automatically detect the boundaries and fill the area with the selected color.
- To change the color of an area, simply select the new color and click on the desired area using the live paint bucket tool.
The live paint bucket tool provides a convenient way to experiment with different color schemes and add vibrancy to your vector image.
Cleaning Up And Simplifying Paths:
Cleaning up and simplifying paths is crucial for optimizing your vector image. It ensures that the final image is visually appealing and reduces file size. Here are some techniques you can use to achieve cleaner paths:
- Use the direct selection tool to select individual anchor points or segments and adjust their positions or delete them if necessary.
- Utilize the simplify command to automatically clean up complex paths. Go to object > path > simplify and adjust the settings to reduce the number of anchor points and simplify the path while maintaining the overall shape.
- Remove unnecessary overlapping paths or shapes that might clutter your artwork. Use the pathfinder panel to merge or exclude overlapping shapes.
By cleaning up and simplifying paths, you can achieve a more refined and visually pleasing vector image.
Adding Or Removing Details:
Sometimes, you may need to add or remove details in your vector image to achieve the desired look. Here’s how you can do it:
- To add details, use the pen tool to draw new shapes or lines and adjust them using the direct selection tool.
- If you want to remove details, select the unwanted anchor points or segments using the direct selection tool and press the delete key.
Adding or removing details helps you customize your vector image, making it unique to your needs.
Now that you know how to refine and edit your vector image using tools like the live paint bucket tool, cleaning up paths, and adjusting details, you can take your artwork to the next level. Experiment, explore, and unleash your creativity to create stunning vector images in adobe illustrator.
Using Masks And Clipping Paths
Learn how to convert raster images to vector format in illustrator using masks and clipping paths. With step-by-step instructions, you’ll be able to achieve high-quality, scalable graphics for your designs.
Applying Clipping Masks
Are you looking to convert your raster images to vector format in illustrator? Look no further! In this section, we will explore the process of using masks and clipping paths to achieve this transformation. Whether you’re a beginner or an experienced designer, these techniques will help you create crisp, scalable vector graphics.
Creating Custom Masks For Complex Images:
When working with complex images that have intricate details or irregular shapes, it’s important to use custom masks to ensure accuracy and precision. Here’s how you can do it:
- Step 1: Select the image you want to convert to a vector format.
- Step 2: Create a shape using the pen tool or any other shape tool.
- Step 3: Position the shape over the image, making sure it covers the areas you want to keep.
- Step 4: Right-click on the shape layer and choose “create clipping mask” to apply the mask.
- Step 5: Adjust the mask if needed by selecting the mask layer and making modifications to the shape.
By creating custom masks, you can retain the intricate details of your complex images while converting them to vector format.
Remember, using masks and clipping paths in illustrator is a powerful technique that enables you to transform raster images into scalable vector graphics. By applying clipping masks and creating custom masks for complex images, you have the flexibility to preserve specific areas or remove unwanted elements.
Mastering these techniques will open up a world of possibilities for your vector designs, giving you greater control and flexibility in your creative process. So go ahead, give it a try, and unlock the full potential of illustrator for raster to vector conversion.
Incorporating Typography And Colors
Discover how to easily convert raster images to vector graphics in illustrator by incorporating typography and colors. Enhance your designs with this simple and effective technique.
Converting Text To Outlines
- To incorporate typography into a vector image, you need to convert text to outlines.
- This ensures fonts remain intact and can be edited as shapes rather than traditional text.
- Here’s how you can convert text to outlines in illustrator:
- Select the text you want to convert.
- Right-click and choose “create outlines” from the context menu.
- The text will now be converted into vector shapes.
- You can then adjust and manipulate the text as needed using the direct selection or pen tool.
Adding And Editing Colors In The Vector Image
- Colors play a crucial role in enhancing the visual appeal of a vector image.
- Luckily, illustrator provides various options for adding and editing colors. Here’s how:
- To add colors, you can use the fill and stroke options in the toolbar.
- Simply select the object or shape you want to color, and choose a desired color from the swatches panel or use the color picker tool.
- You can also apply gradients to create smooth transitions between colors.
- To edit colors, select the object, and use the direct selection tool to change the fill or stroke color.
- Additionally, illustrator allows you to adjust the opacity or transparency of colors for a more subtle or vibrant effect.
Remember, incorporating typography and colors in a vector image can enhance its visual impact and create a standout design. Experiment with different fonts, colors, and effects to achieve the desired aesthetic. Happy designing!
Choosing The Appropriate File Format
Learn how to change raster to vector in illustrator by choosing the appropriate file format. Discover the step-by-step process for converting images to scalable vector graphics for better quality and flexibility in design.
Raster images are made up of pixels, while vector images are composed of paths and curves. Converting raster images to vector format can be achieved using adobe illustrator, a powerful software that enables you to create and edit vector graphics.
One crucial step in this process is choosing the appropriate file format for your vector images. By considering factors such as file size and compatibility, you can ensure optimal results. In this section, we will explore common file formats for vector images.
Common File Formats For Vector Images:
There are several file formats available for vector images, each with its own features and compatibility. Here are the most common ones:
- Eps (encapsulated postscript): Eps files are widely used in the printing industry, making them an excellent choice for professional purposes. They can be opened by various design software, ensuring compatibility across platforms. Eps files also support high-quality resolution, making them suitable for detailed illustrations and graphics.
- Ai (adobe illustrator): As the native file format of adobe illustrator, ai files are recommended for editing vector images. They preserve all the layers, shapes, and colors used within your artwork, allowing for seamless modifications. Ai files are compatible with illustrator versions, ensuring easy collaboration between designers.
- Pdf (portable document format): Pdf files are versatile and widely compatible across different devices and operating systems, making them ideal for sharing vector graphics with clients or colleagues. They allow you to maintain the file’s integrity while providing the flexibility to view and print the artwork on various platforms.
- Svg (scalable vector graphics): Svg files are widely used in web design and are supported by most browsers. They offer several advantages, such as small file sizes, which ensure faster loading times for websites. Additionally, svg files are resolution-independent and can be scaled without losing quality.
- Dxf (drawing exchange format): Dxf files are commonly used in cad (computer-aided design) applications. They facilitate the exchange of vector graphics between different software programs, ensuring compatibility and seamless collaboration across various design tools.
Choosing the appropriate file format for your vector images is crucial to ensure compatibility and optimize the file size. Consider the specific requirements of your project and the platforms on which the artwork will be used to make an informed decision.
Quality Control And Final Touches
Transforming raster images into vector graphics is made easy with adobe illustrator. Discover the art of quality control and final touches with this powerful software, ensuring your designs are crisp, scalable, and ready for any project.
After converting a raster image to a vector in illustrator, it’s essential to perform quality control and apply final touches to ensure the best results. This step ensures that the vector image is flawless and well-optimized for various applications. Below, we will discuss the two crucial aspects of quality control and final touches in detail.
Reviewing And Correcting Any Errors Or Imperfections
To ensure the vector image is free from errors or imperfections, it’s vital to review and correct any issues that might have arisen during the conversion process. Here are some key steps to follow:
- Checking for stray points and anchor points: Inspect the vector image closely and remove any stray or unnecessary anchor points. These points can affect the overall smoothness and accuracy of the image.
- Adjusting paths and curves: If the vector image contains irregular or jagged paths, it’s essential to refine them for a more polished look. Smooth out any curves and adjust paths to enhance the overall quality.
- Checking for missing details: Compare the vector image with the original raster image to ensure all the important details are present. Pay close attention to smaller elements or intricate parts that might have been lost during the conversion.
- Eliminating unwanted artifacts: Sometimes, artifacts or remnants from the raster image might persist in the vector version. These can include artifacts like noise, artifacts, or undesired texture. Carefully inspect the image and remove any unwanted elements in order to achieve a clean result.
Optimizing The Vector Image For Different Applications
Once all the errors and imperfections have been addressed, it’s time to optimize the vector image for different applications. Here are some essential steps to consider:
- Scaling the image: Vector images can be scaled without loss of quality, so adjust the size as per the requirements of the particular application. Whether it’s for print or web, make sure the image retains its sharpness and clarity at different sizes.
- Choosing appropriate file formats: Select the appropriate file format for the intended use of the vector image. Formats like svg (scalable vector graphics) are ideal for web applications, while eps (encapsulated postscript) or ai (adobe illustrator) files are suitable for print.
- Assigning colors and gradients: Experiment with different colors and gradients to enhance the visual appeal of the vector image. Consider the color scheme and overall design aesthetic of the project to make the right choices.
- Exporting the final image: Finally, export the vector image in the desired format and ensure it retains its quality during the saving process. Optimize the file size without compromising on the image’s integrity.
Taking the time to review and correct any errors or imperfections, as well as optimizing the vector image for different applications, is crucial for achieving a high-quality result. By following these steps, you can breathe new life into raster images and unlock their potential for a wide range of uses.
Frequently Asked Questions For How To Change Raster To Vector In Illustrator
How Do I Change A Raster Image To A Vector Image In Illustrator?
To change a raster image to a vector image in illustrator, you can use the image trace feature. Simply import your raster image, go to the object menu, select image trace, and choose the preset that suits your needs. Illustrator will then convert your raster image into a vector image.
What Are The Advantages Of Converting A Raster To A Vector In Illustrator?
Converting a raster image to a vector image in illustrator offers several advantages. Firstly, vector images can be scaled up or down without any loss of quality. Secondly, they can be easily edited and manipulated using illustrator’s tools and features.
Lastly, vector images are generally smaller in file size, making them ideal for web and print purposes.
Can I Change The Colors Of A Raster Image After Converting It To A Vector In Illustrator?
Yes, you can change the colors of a raster image after converting it to a vector in illustrator. Illustrator allows you to select and edit individual vector paths and shapes, which means you can easily change the colors of different elements within the vector image.
Simply use the selection tools and the color swatches in illustrator to make the desired color changes.
How Accurate Is The Conversion Process From Raster To Vector In Illustrator?
The accuracy of the conversion process from raster to vector in illustrator largely depends on the complexity and quality of the original raster image. Illustrator uses algorithms to automatically trace and convert the image into vector paths, but it may not always produce a perfect result.
You may need to manually make adjustments and clean up the vector image to achieve the desired accuracy.
Can I Trace And Convert Multiple Raster Images At Once In Illustrator?
Yes, you can trace and convert multiple raster images at once in illustrator. Simply select all the raster images you want to convert, go to the object menu, and choose image trace. Illustrator will apply the same settings and trace each individual image separately, allowing you to save time and effort when converting multiple images.
Conclusion
To sum up, converting raster to vector in adobe illustrator can enhance the versatility and scalability of your digital designs. By following the steps outlined in this blog post, you can effectively transform your pixel-based artwork into editable vector graphics.
Remember to select the appropriate settings and tools, such as the image trace feature or the pen tool, to achieve the best results. Don’t forget to optimize your vector images for web or print by adjusting the color mode and saving them in suitable file formats.
With this newfound skill, you can seamlessly create visually appealing graphics that can be resized infinitely without losing clarity. So, go ahead and try out these techniques to unlock the amazing potential of vector graphics in illustrator.


